
ARC Raiders Beachcombing Guide

ARC Raiders Beachcombing Guide

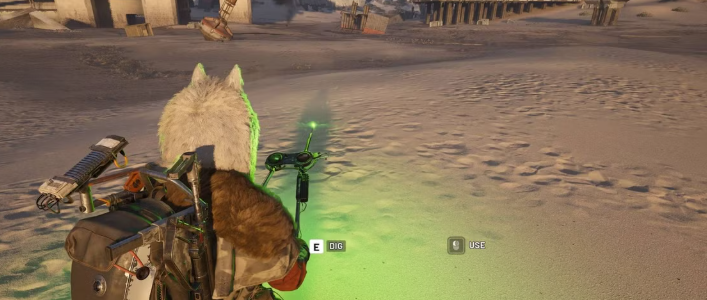
The Riven Tides update in ARC Raiders has introduced one of the most interesting exploration mechanics yet: the Beachcombing map condition. This system transforms coastal areas into dynamic loot zones where players can search for buried treasures using a special tool known as the Dockmaster’s Detector.

For players looking to maximize progression, farm valuable ARC Raiders Items, and stay ahead in the evolving meta, understanding Beachcombing is essential. It also plays a major role in crafting progression and long-term gearing efficiency, especially when combined with blueprint-based upgrades like those you might unlock or buy ARC Raiders Blueprints for later builds.

What Is Beachcombing in ARC Raiders?

Beachcombing is a minor map condition exclusive to the Riven Tides coastal map. When active, it changes how shoreline areas function by hiding loot beneath the sand and altering how players interact with the environment.

Instead of relying purely on combat or container looting, players must actively scan the terrain for buried items. This introduces a slower, more methodical playstyle that rewards patience and map awareness.

The system is tied directly to a gadget called the Dockmaster’s Detector, which acts like a metal detector and is required to locate hidden loot. Without it, Beachcombing zones are essentially normal beaches with no visible rewards.

How the Dockmaster’s Detector Works

The Dockmaster’s Detector is the core tool behind Beachcombing gameplay. It is equipped like a utility item and provides audio and visual feedback when players are near buried loot.

Once active, it:

·Emits signals when near hidden objects

·Guides players toward dig spots in the sand

·Allows interaction to uncover loot caches

However, it also introduces risk. Beachcombing zones are often exposed, meaning players using the detector can become vulnerable while scanning open terrain.

Loot discovered through the system can include:

·Ammunition and consumables

·Crafting materials

·Rare collectibles

·Environmental hazards like mines or hostile ARC units

This makes every dig a gamble between reward and danger.

How to Get the Dockmaster’s Detector

There are multiple ways to obtain the Dockmaster’s Detector, making it accessible even for newer players:

1. Quest Rewards

Certain early quests reward the detector directly, giving players a guaranteed entry point into Beachcombing gameplay.

2. Avian Alarm Project Progression

Advancing through the Avian Alarm Raider Project unlocks the detector as part of its reward chain, tying exploration systems together.

3. World Loot

The detector can also appear in containers across Riven Tides, though this method is less reliable.

Because it can be lost during raids, players often need to reacquire or replace it frequently,y depending on their survival rate.

Why Beachcombing Matters for Items

Beachcombing is not just a side activity-it’s a high-value resource loop that directly feeds into progression.

By consistently running Beachcombing zones, players can obtain:

·Rare crafting components

·Consumables for survival

·Loot caches tied to environmental events

·Materials used for upgrading gear

This makes it one of the most efficient ways to gather ARC Raiders Items, especially for players who prefer exploration over constant combat.

However, efficiency depends heavily on knowing when and where Beachcombing is active, as well as how to safely extract with your loot intact.

Best Strategy for Beachcombing Runs

To get the most value out of Beachcombing, players should focus on efficiency and survival rather than aggressive engagement.

1. Stick to Coastal Routes

Beachcombing only activates along shoreline zones, so avoid inland detours unless necessary.

2. Use the Detector in Short Bursts

Constant scanning makes you an easy target. Move between scans to reduce exposure.

3. Prioritize High-Value Dig Sites

Not all loot is equal. Focus on rare or visually distinct signals from the detector.

4. Avoid Unnecessary Combat

Since loot is tied to exploration, PvP fights can waste time and risk losing collected items.

How Beachcombing Fits Into the Riven Tides Meta

The introduction of Beachcombing reflects a larger shift in ARC Raiders toward hybrid gameplay systems. Instead of purely combat-focused raids, players are now encouraged to:

·Explore environmental systems

·Use specialized tools

·Adapt to changing map conditions

·Balance risk and reward more carefully

This makes the Riven Tides map one of the most dynamic zones in the game, especially for farming ARC Raiders items efficiently.

Blueprint Progression and Long-Term Value

As players progress deeper into the game, gear optimization becomes essential. This is where blueprints play a major role.

Blueprints allow players to craft stronger weapons and tools, improving:

·Survival chances during Beachcombing runs

·Efficiency when farming ARC enemies

·Extraction success rates with high-value loot

Because of their importance, many players choose to grind intensively or strategically buy ARC Raiders Blueprints to accelerate their progression and reduce reliance on RNG-based loot.

When combined with Beachcombing, blueprint-driven builds can significantly increase farming efficiency.

Final Thoughts

Beachcombing is one of the most unique additions to ARC Raiders, turning the coastline into a high-risk, high-reward scavenging zone. By using the Dockmaster’s Detector effectively, players can uncover hidden loot and significantly boost their resource income.


MLB The Show 26: The Best Ways to Earn Stubs Quickly in Diamond Dynasty

MLB The Show 26: The Best Ways to Earn Stubs Quickly in Diamond Dynasty

In MLB The Show 26, Diamond Dynasty is all about building a powerhouse team, and Stubs are the currency that makes it happen. Whether you’re chasing elite players, opening packs, or upgrading your squad, having a steady flow of Stubs is essential. The good news is that there are several efficient ways to stack them without wasting time.

This guide breaks down the most effective methods to earn Stubs fast, along with a few smart strategies to help you maximize every minute you spend playing.

What Stubs Are Used For

Stubs are the backbone of Diamond Dynasty progression. You’ll use them to:

Buy packs that can contain high-tier or rare players
Pick up cards directly from the marketplace
Upgrade gear, stadiums, and team elements

Because everything valuable ties back to Stubs, earning them efficiently is one of the most important parts of improving your team.

Top Ways to Earn Stubs Fast

1.Knock Out Daily and Weekly Missions

    Missions are one of the easiest and most consistent Stub sources in the game. They usually involve simple objectives like getting hits, pitching innings, or winning games in specific modes.

    The key is to check them regularly and stack multiple objectives at once. You’ll often complete several missions in a single session without even trying too hard, which makes this method incredibly efficient.

    2.Grind Conquest Maps

      Conquest mode blends gameplay with strategy, letting you take over territories while earning rewards along the way.

      Why it’s worth your time:

      Strong Stub payouts for clearing maps

      Packs and hidden rewards scattered across territories

      Repeatable structure that encourages steady progression

      If you target weaker areas first and play efficiently, Conquest can become one of the most reliable Stub farms in the game.

      3.Complete Moments

        Moments are short, scenario-based challenges that recreate specific situations. They’re quick to play and often reward you with Stubs and valuable cards.

        Some Moments are especially lucrative because:

        They offer bonus rewards for strong performances

        They can be completed in just a few minutes

        The cards you earn can sometimes be sold for extra Stubs

        If you’re short on time, this is one of the best ways to make quick progress.

        4.Play Online Modes

          Head-to-head games against other players can be a great source of Stubs, especially if you’re consistent.

          To get the most out of online play:

          Join events with boosted rewards
          Aim for win streak bonuses when available
          Use balanced lineups to stay competitive

          While it can be more challenging than offline modes, the payouts are often worth it if you can hold your own.

          5.Flip and Sell Cards on the Marketplace

            One of the most overlooked methods is using the in-game marketplace. If you have duplicate or unused cards, you can sell them for Stubs.

            To maximize profits:

            Watch price trends and sell when demand spikes
            Flip cards by buying low and selling high
            Prioritize rare or high-rated cards for bigger returns

            This approach requires a bit of patience, but it can generate a surprising amount of Stubs without grinding gameplay.Turn every swing into a home run with MMOexp reliable MLB The Show 26 Stubs service—your shortcut to building a championship team.

            6.Progress Through Programs

              Programs are long-term progression paths that reward you for completing milestones and challenges. As you advance, you’ll earn Stubs, packs, and valuable cards.

              These rewards add up quickly, especially if you:

              Combine program goals with daily missions

              Focus on objectives that overlap

              Stay consistent over time

              Programs are one of the best “passive” ways to earn Stubs while playing normally.Skip the grind and play your way—MMOexp makes it easy to secure buy MLB 26 Stubs quickly and safely.

              Smart Tips to Boost Your Earnings

              1.Be efficient with your time: Focus on activities that give the best rewards for the time invested—Moments and Conquest are usually top-tier options.

              2.Stack objectives: Try to complete multiple missions at once instead of tackling them separately.

              3.Monitor the market: Selling at the right time can make a huge difference in your profits.

              Earning Stubs in MLB The Show 26 doesn’t have to feel like a grind if you approach it the right way. By mixing mission completion, Conquest runs, Moments challenges, and smart marketplace moves, you can steadily build your currency and improve your roster.

              Diablo IV: Ultimate Leveling Guide – Season 13 & Lord of Hatred

              Diablo IV: Ultimate Leveling Guide – Season 13 & Lord of Hatred

              Wanderers, the time is almost here. With only 24 hours until the launch of the Lord of Hatred, this guide will take you from level 1 straight to level 70 as fast as possible. Whether you need to buy Diablo 4 Gold to gear up faster or are just looking for the best leveling route, this guide has you covered. Whether you own the expansion or are jumping into Season 13, you’ll find a path to your goals here.

              1. Before You Start: Essential Resources

              Before you even log in, bookmark mmoexp.com (free, no sign-up required). Use it to stay organized. You should also join the official Discord server linked on the site. It features:

              · Active voice chat and groups playing daily.

              · A non-stop trade chat from season launch to end.

              · Three in-game clans. To join, simply leave your BattleTag—no reason needed.

              2. Should You Use a Leveling Build Guide?

              You can explore blindly, but there are major differences between last season and this one. If you want optimization:

              · Click “Seasonal Leveling” at the top of mmoexp.com.

              · Grab a leveling guide for your class (e.g., Barbarian with Ancients—untested but looks fun).

              · Important: Skill points unlock at different levels (e.g., one node at level 1, then level 3, 4, 6, etc.). Top modifiers unlock on separate tracks. Follow the leveling path order in the planner to optimize your build.

              · Pro Tip: The guide creator will be live when servers go up to answer questions and update information in real-time.

              3. Difficulty & Campaign Choice

              If You Have Lord of Hatred (Expansion):

              · Start on Normal difficulty. The campaign takes ~8 hours and gets you to ~level 45-50. Boss fights on Penitent will slow you down significantly. Normal is fastest.

              · Play the entire campaign on your first character. You cannot skip it on your first run. This is a once-in-a-lifetime story event—don’t rush it.

              If You Do NOT Have the Expansion:

              · You can still use this guide. Skip the campaign-specific steps and focus on Whispers, Hell Tides, and Nightmare Dungeons.

              4. First Steps In-Game (First 15 Minutes)

              Once you load in, do these four things immediately:

              1. Unlock your pets – Click the pet icon in the menu to equip them.

              2. Set your cosmetics – You can’t do good if you don’t look good.

              3. Unlock mercenaries (Vessel of Hatred owners only):

              4. Open the Mercenary tab.

              · Click Teleport to go to their location. Pick up your mercenary, then teleport back to continue the campaign.

              5. Change difficulty if needed – Use the world statue.

              5. Leveling Milestones (1–70)

              Level RangeAction
              1–10Follow campaign. At level 10, unlock Tempers. Look for Elemental Surge (name may have changed). It adds massive base damage—especially strong on Barbarian with multiple weapons.
              15 (or class-specific level like 25 for Necro)Do your Class Quest. Even if you’ve done it before, you’ll get an arc cache with tempering manuals and legendaries. Drop rates may have changed, so this is worthwhile.
              15+If you feel comfortable, swap to Hard difficulty at the world statue for bonus XP.
              20–35Gear check every ~10 levels. Temper, add gems/runes, equip new items. Don’t over-spend time in town.
              30–40Start unlocking key dungeons for your Codex of Power. Use the Pin on Map feature inside your Codex to auto-navigate to any dungeon.
              35–50Gear check every ~5 levels as things slow down and your build comes online.
              45Strongholds begin giving significant XP. Experiment here if Hell Tides feel stale.
              50–70Switch to Expert or Penitent difficulty if your character can handle it. Focus on Nightmare Dungeons (for glyphs & masterworking) or stay in Hell Tides.

              6. The Best Hell Tide Strategy (Fastest XP in the Game)

              This works for both expansion and non-expansion players.

              1. Play on Normal difficulty (fastest kills).

              2. Farm cinders until you have 800–1,000.

              3. Do not open any chests yet.

              4. Return to the world statue and switch to the highest difficulty you can survive (up to Penitent for +175% XP).

              5. Mount up, sprint to each chest, and open them quickly.

              6. Pro move: Hop off your horse and open the chest immediately—monsters won’t react fast enough.

              7. Whisper caches opened on higher difficulties also give more XP.

              8. How to know when to move up a difficulty tier: If you kill monsters just as fast as the previous tier, you’re ready.

              Note: Incense and elixirs have been removed. Do not look for them.

              7. Capstone Dungeons & Unlocking The Pit

              Important: Capstone levels may have changed. Previously 30/50/60, now likely 40/60/70. We’ll update as we confirm.

              · Hellish Descent – Unlocks The Pit. This is required even if you’ve played before.

              To find your capstone dungeon easily:

              · Open Seasonal Ranks → Click “View on Map” → Auto-pin the location.

              · Do not enter too early. Monsters are fixed at level 30 (or whatever the new floor is). Entering at level 20 = death. Entering at level 40 = easy smash.

              The Pit Tiers & Difficulty Unlocks (Updated for Season 13):

              · Tier 1 = Normal

              · Tier 3 = Hard

              · Tier 5 = Expert

              · Tier 7 = Penitent

              · Tier 10 = Torment 1

              Complete Tier 10 to unlock Torment 1 at the world statue.

              8. Endgame Transition (Level 70 → Torment 1)

              Once you hit level 70 and clear the second capstone dungeon on Penitent:

              1. Enter The Pit (located in Scobos). If you own Lord of Hatred, everything you need for endgame is in Scobos.

              2. Complete Tier 10 to unlock Torment 1 difficulty.

              3. Switch to Torment 1 at the world statue.

              4. Now you farm:

              · Ancestral Gear – Start with Infernal Hordes. They currently guarantee greater affix gear (the new chase item).

              · Nightmare Dungeons – For glyph XP and masterworking materials.

              · Boss Mats – For unique target farming.

              9. Unique & Boss Farming

              Use the Unique Target Farming Guide on mmoexp.com Click the favorite button to save the boss loot tables. It shows exactly which boss drops each unique item.

              10. Final Tips for Non-Expansion Players

              · You still get the brand new skill tree (just not all skill modifiers).

              · No seasonal mechanic in Season 13—just the expansion and revamped systems.

              · Your leveling path: Whispers → Hell Tides → Nightmare Dungeons → Capstones → The Pit → Torment.

              11. What’s Coming Next

              A Level 70+ Endgame Guide will be available 1–2 days after the season launches, covering all new Lord of Hatred content. In the meantime, if you want to get a head start on your endgame build, you can buy cheap Diablo IV Items from MMOEXP to save time and focus on farming bosses and pushing higher tiers. Good luck, Wanderer. Share this guide with your friends. Catch you on the cliff side.

              Arc Raiders Test Case Quest Guide

              Arc Raiders Test Case Quest Guide

              Added as part of the Flashpoint update, the Test Case quest in Arc Raiders is a straightforward yet engaging mission that tasks players with collecting specific components from powerful ARC enemies. While it has no hidden puzzles or complex mechanics, knowing where to find each ARCR Items and how to take down the required foes will save you time and frustration.

              This guide breaks down every step of the Test Case quest, from understanding its objectives to mastering enemy takedown strategies. Whether you’re a new player or a seasoned raider, these tips will help you complete the quest efficiently and claim your rewards without unnecessary deaths.

              What Is the Test Case Quest?

              The Test Case quest is given by Apollo, one of the key quest givers in Arc Raiders. Its core objective is simple: gather three unique components from three different ARC enemy types and deliver them to Apollo in Speranza.

              Unlike some of the game’s more complex quests, Test Case has no hidden requirements or time limits. However, you will need to face tough enemies, so coming prepared with the right weapons and gear is essential. Notably, if you already have any of the required components in your inventory, you can donate them directly to Apollo-though you still need to destroy at least one of each enemy type to complete the quest properly.

              Completing the quest rewards you with valuable resources, ammo, and potentially blueprints that will aid you in future raids. It’s a great way to familiarize yourself with common ARC enemies and their weaknesses.

              Step-by-Step Walkthrough: Complete the Test Case Quest

              The Test Case quest can be divided into four simple steps. Follow this order to avoid backtracking and complete the mission in one or two raids.

              Step 1: Destroy a Firefly and Collect the Firefly Burner

              Fireflies are airborne ARC enemies, often described as the flying version of Fireballs. They shower players with fire and can be found on all maps, though they are most commonly spotted on Dam Battlegrounds and Blue Gate.

              To take down a Firefly, focus on its rear rotors-shooting them will disbalance the enemy, making it unable to aim at you. Weapons like the Renegade are ideal for precise shots, while explosives or the Hull Cracker can also destroy a Firefly quickly with a few well-placed shots.

              Once the Firefly is destroyed, loot its remains to collect the Firefly Burner. If you already have one in your inventory, you can donate it to Apollo, but you must still destroy at least one Firefly to progress.

              Step 2: Collect a Hornet Driver

              Hornets are flying ARC enemies that attack with electrical shocks. They are plentiful on all maps, but you’ll find more of them near exfil points on the Blue Gate map. They often patrol alongside Wasps, so stay alert for groups.

              The easiest way to kill a Hornet is to aim for its exposed back thrusters. A few shots to these thrusters will spin the enemy out of control and cause it to crash. Weapons like the Aphelion or Hull Cracker work well here, but any precise weapon will do the job.

              After defeating a Hornet, loot its body to get the Hornet Driver. If you already have this component in your inventory, you can skip farming another one and proceed to the next step.

              Step 3: Collect a Fireball Burner

              Fireballs are rolling ARC enemies that surprise players with fire blasts. They are commonly found inside buildings on any map and are often accompanied by Pops, so approach with caution. The Buried City map is a great place to find them consistently.

              To take down a Fireball, wait for it to charge at you-it will expose its core just before throwing fire. A single shot to this core is enough to destroy it. For long-range takedowns, use a heavy weapon like the Anvil or Ferro to eliminate it even while it’s armored.

              Loot the Fireball’s remains to collect the Fireball Burner. Like the other components, if you already have one, you can donate it directly to Apollo without farming another Fireball.

              Step 4: Deliver All Components to Apollo

              Once you have all three components-the Firefly Burner, Hornet Driver, and Fireball Burner-return to Speranza and locate Apollo. Interact with him to donate the items, and the quest will be marked as complete.

              Remember to extract safely after collecting the components if you’re on a raid-dying before extracting will cause you to lose the items, forcing you to farm them again. Using an augment with a Safe Pocket is recommended to protect your loot in case of death.

              Pro Tips for Completing the Test Case Quest Faster

              While the quest is simple, these tips will help you complete it in the fewest raids possible, saving you time and resources.

              First, check your inventory before starting. If you already have any of the required components (Hornet Driver, Fireball Burner, etc.), you can skip farming that enemy, which cuts down on quest time significantly.

              Second, choose your maps wisely. Blue Gate is ideal for farming Hornets and Fireflies, while Buried City is perfect for Fireballs. Focusing on one map per raid can help you collect multiple components at once.

              Third, come prepared with the right gear. Bring precise weapons for flying enemies (Fireflies and Hornets) and heavy weapons for Fireballs. Don’t forget to pack shields and ammo-these enemies can be irritating if you’re caught in the open without cover.

              Finally, don’t rush. Take your time to eliminate enemies from cover, especially when facing Fireballs and Fireflies. Rushing in can lead to unnecessary deaths and lost progress.

              Final Thoughts

              The Test Case quest is a great introduction to some of Arc Raiders’ most common and dangerous ARC enemies. By following this guide, you’ll be able to collect all required components quickly, avoid frustrating deaths, and claim your rewards. Players will thereby acquire more resources—such as cheap ARC Raiders Materials, blueprints, and coins—and enjoy a fair gaming environment and experience.

              Remember to use the right weapons for each enemy, check your inventory beforehand, and extract safely to protect your loot. With these tips, you’ll complete the Test Case quest in no time and be ready for more challenging missions in Arc Raiders.